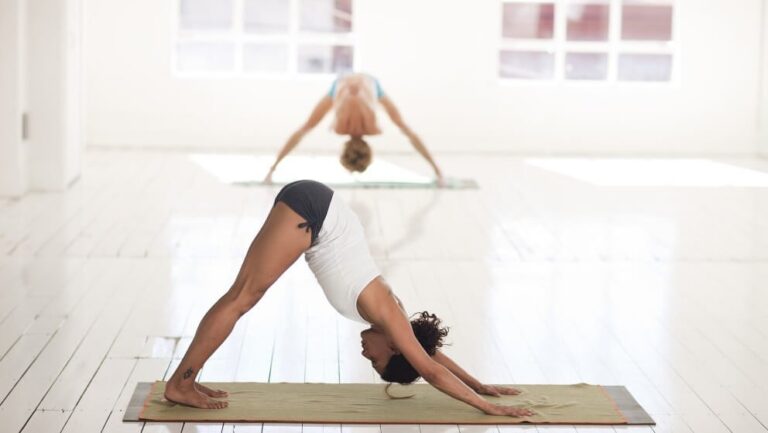
In this 9th article, we arrive in downward facing dog and consider many questions, perhaps even concerns, surrounding downward facing dog.
https://www.yoganatomy.com/downward-facing-dog-sun-salutations/ – David Keil
You made it! You’re in downward facing dog. Now what? We left off in Sun Salutations 8 with the movement that gets us from upward facing dog into downward facing dog. Downward facing dog is more of a static posture, or is it?
There are many questions, perhaps even concerns surrounding downward facing dog.
Is it OK to walk my feet forward a little?
How far apart should my feet be?
Should I turn my feet in so the outer edge is parallel to the mat?
Should my heels touch the floor?
Should I bend my knees?
Which way should I tilt my pelvis?
What do I do with my shoulders?
So goes the long list of worries we might have once we arrive in downward facing dog. Arguably, in many styles of yoga, this is the first posture that we do within an individual practice. Why do I say that? Well, it’s common in many styles of practice to do sun salutations first and downward facing dog is probably the first posture that we hold for any extended period of time.
As for the list of queries above, any one of these may be appropriate for you. Wait, let me try that again. Any of these may be completely wrong for you. Which one is it? Both.
Let’s take a look at these and see if we can figure out the when and the why. Perhaps then, you’ll have a better sense of when to apply any, all, or none of these to your own practice.
Is it OK to walk my feet forward a little?
I’ve had a fair number of people tell me that they were told off for walking their feet forward after arriving in downward facing dog. I have to admit I’ve never really understood why using the same distance between hands and feet in downward facing dog as you do in upward facing dog was particularly important. To me the distance between hands and feet in downward facing dog is related to the distance set up between the hands and the feet in up dog as well as the way in which you transition from upward facing dog to downward facing dog. They are different postures, and may require different foot to hand relationships.
You may recall from a previous Sun Salutation article, the one about upward facing dog, that the distance between the hands and feet determined a lot about where our shoulders would end up relative to the wrist below. This could also determine how much pressure would be directed into our back and where exactly that pressure might be felt.
In downward facing dog, it doesn’t seem to me that the consequences of distance between hands and feet are nearly as potentially harmful as in upward facing dog. In the case of downward facing dog, the consequence of changing the distance between hands and feet is really just a change in the way one experiences the posture.
From an experiential point of view, the biggest change that happens when we walk our feet further forward or keep them further back is the amount of pressure or lack of pressure that we experience through our calf muscles. In other words do we want our heels to go down to the floor or not? Do we want a crease in our ankle or not? Do we want to feel the “stretch” sensation in our calves or not?
From the point of view of the back line of the body and how it relates to forward bends, lengthening the calf muscles has an impact on the hamstrings above them. I discuss this at length in Functional Anatomy of Yoga (p. 241). In other words, lengthening the calf muscle has a positive effect on the hamstrings and the rest of the back line of the body. Of course, there are other places where you can lengthen calf muscles in your practice. It’s not like it’s all going to happen in downward facing dog.
For beginners, walking the feet in might have a couple of positive impacts. By walking the feet in, they may get closer to placing the heels on the floor, or actually get their heels on the floor. This can create a sense of grounding for them. The other impact of walking the feet in is a change in the alignment of the shoulders that reduces the amount of strength needed in the shoulders and the arms. I’ve observed many a beginner walk the feet in as a result of a lack of strength. As long as it is only a stage of progression, there may be positive benefits from doing this even if it’s not where we think downward facing dog should be in the long-term.
How far apart should my feet be from each other?
There are stylistic differences in different lineages of asana practice. From an anatomical point of view, your feet most naturally line up under your hips. Too wide or too narrow is not right or wrong. Most of us default to hip width, which is also what corresponds most often with what is generally accepted from an anatomical point of view.
Personally, I go with feet just less than hip width apart. I don’t demand this of students, but this is what feels most supportive for my legs and my body. If I see a student with their legs wider than their hips, it often leads me to ask them questions about their experience. What does it feel like and why? It’s possible that based on their anatomy or tensional patterns, this is appropriate for them. Changing the distance between their feet may aggravate other areas of their body or it might be that other areas need to open before their legs can line up with their hips.
Should I turn my feet in so the outer edge is parallel to the mat?
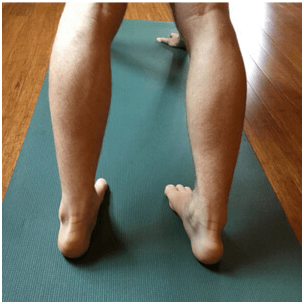
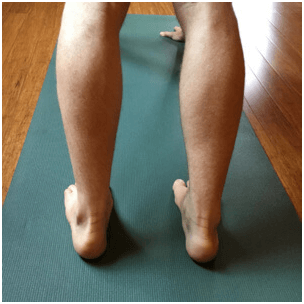
This is a cue that I see more and more of. I’m sure there is a benefit to this for some people, but it’s not my experience. From an anatomical point of view, it is the inside of the feet that should be closer to parallel with one another. To be honest, I am more likely to look up to the knees to see where they are pointing as a sign of what the student’s’ hips are really doing.

IN THIS IMAGE THE FEET ARE ALIGNED SO THAT THE INNER EDGE IS POINTING STRAIGHT FORWARD.

IN THIS IMAGE THE OUTER EDGE OF THE FOOT IS ALIGNED TO THE OUTER EDGE OF THE MAT. NOTICE THE CHANGE IN THE KNEE.
At its worst, people who are more naturally externally rotated at their hip joints, especially say, dancers who have been turning out since childhood, should not overdo this one. I’ve met a number of students (a few dancers) who were doing this and we determined that this was the most likely cause of problems down their legs and into their knees.
When we over rotate internally at the hip joint, the tensor fasciae latae and other internal rotators such as the anterior (front) of the gluteus minimus and gluteus medius work hard to hold this position. I’ve seen everything from radiating pain down the leg, to knee pain, to problems when trying to do more advanced asana work such as leg behind head posture (where external rotation is required). Maintaining this long term internal rotation of the feet at the hip joint while in downward facing dog, and other postures where the feet are supposed to be parallel (even tadasana), can lead to problems, in my anecdotal experience.
In addition to this, I always consider the alignment of the most vulnerable joint. For instance, in the arms, the most vulnerable joints are the wrist and the shoulders. Although the elbows do reflect what’s going on in the entire arm, I focus more on making sure that the vulnerable joints are taken care of first. In the case of the leg, the knee is the most vulnerable joint. When you have your hips rotated internally so that the feet are parallel on the outer edge, chances are the knees are now pointing inward. To be fair, in a static posture like this, I’m not sure that it is an issue by itself. But as you know from reading my articles and book, anatomical patterns and postures are interconnected. Every time you set up this pattern, you are ingraining it in your neuromuscular system, so make sure it’s one that suits you.
Having said all of that, I know it’s not the case that everyone who turns their feet in like this ends up with problems. If your legs are inclined to internally rotate, you probably won’t have an issue at all. Make sure you know what your natural body pattern is before you start changing it.
Should I bend my knees?
There are ups and downs to bending the knees. You have to figure out what is most important for you at this moment in your practice. The most common reason to bend the knees is to allow the pelvis to tilt forward (anterior tilt) and help align the spine with the pelvis. What we would usually see in downward facing dog, when students are inclined to bend their knees, is that the back is rounded. When we bend the knees what we are doing is releasing tension in the hamstrings that attach to the pelvis at the sit bones (ischial tuberosities). By releasing the tension attached to the pelvis, there is usually more freedom for the pelvis to do its anterior tilt and line up with the spine. That’s how you get the curve out!
So, yes, you should bend your knees if you’re focused on getting that spine straight, which is a good thing to be focused on.
The downside is that you may be losing the pressure on both the hamstrings and the calves at the same time. In a way, those are the real culprits preventing the pelvis from tilting in the first place. With less pressure on the calves and hamstrings, it could take longer for them to open and allow the pelvis to tilt. It’s a bit of a catch twenty two, isn’t it? What’s important is that you’re choosing the right approach for you at this point in your practice. It could be pelvic tilt and alignment of the spine or it could be focusing on the calves and hamstrings. If you have back pain and problems, BEND YOUR KNEES.
What do I do with my shoulders?
The shoulders are another place where there is debate about what we should be trying to achieve in downward facing dog. I wrote an article about what to do with your shoulders in downward facing dog some time ago and I’ll give you a summary of my thoughts here.
For me downward facing dog offers an opportunity to both lengthen some parts of the shoulder, such as the latissimus dorsi muscle, as well as strengthen what I refer to as the core of the shoulder girdle. I take it further in my book and call this the psoas of the upper body.
The hands and shoulders are functionally tied together. Changing either end has an effect on the other. My focus here however is on the shoulders. The most common cue given is one that tries to get those shoulders out of the ears. It’s a common pitfall for beginners until they have the right amount of strength and body awareness.
What do I do with my shoulder blades?
The shoulder blades (scapulae) are the place that I start. The reason I start here is because moving the scapulae starts to create changes through the rest of the arm, but more importantly, the change comes from the larger and stronger muscles. The core of the shoulder girdle I was referring to before is the serratus anterior muscle. For me, it’s the part of the psoas of the upper body that represents and creates strength and stability. Therefore, when we move with this muscle in mind we are coming from larger stronger muscles first and then fine tuning with the smaller muscles of the shoulder joint.
I recommend using the serratus anterior to draw the shoulder blades around the side of the body. This is another way of saying draw the shoulder blades down your back. Well, sort of. Because serratus anterior is also an upward rotator of the scapula, when you engage it to pull your shoulders wider, you are also doing upward rotation of the scapula. This is naturally going to make the part of your shoulder blade at the top of the scapula, called the superior angle, drop down and away from the ears.
That’s not to say that you can’t just draw the scapulae down your back (depression). Your scapula does do elevation and depression. When you only pull them down your back, you are essentially isolating the depression part of the movement and not necessarily engaging this important stabilizer of the scapula. I like the mix of the two. Why? Well as we talked about, way back in Sun Salutations Part 4 and part 5, we use the serratus for so many other postures where we are putting our body weight onto our hands. It’s worth it to make the connection to that muscle here when you’re not completely upside down or trying to do some type of arm balance.
Also, by engaging the serratus and extending through arms at the same time, you can access some extra length in your latissimus dorsi muscle. This is tied to postures where your arms are over your head, like warrior, as well as the ever important urdhva dhanurasana where you need length in your latissimus.
Conclusion
Remember, verbal cues and general rules of alignment are great starting places. Unfortunately, they’re not always one size fits all. You may need to focus on one aspect of a posture before focusing on the others. This all depends on your body type and structure, as well as your level of practice and ability. Following some alignment cues requires very nuanced control of your or your students body.

