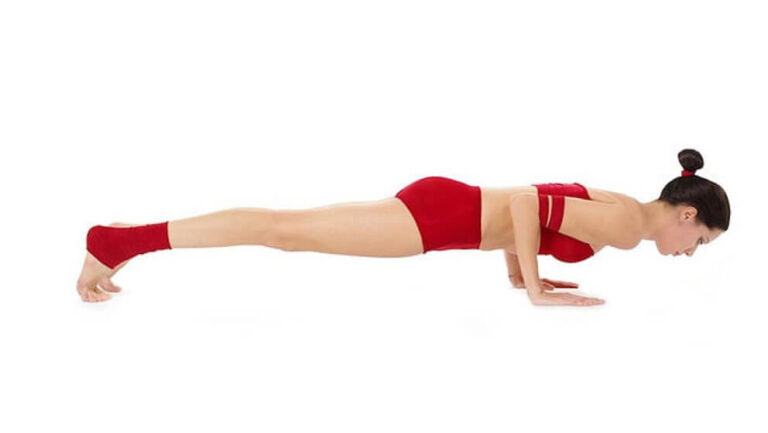
Challenging and strength-building, chaturanga dandasana (four-limbed staff pose) is probably one of the most frequently practiced postures in vinyasa classes. Its classic alignment is a challenge to many students from the get-go, but as our practice and understanding of the human body evolve, our alignment in postures can as well.
https://yogainternational.com/article/view/realign-chaturanga – by Leah Sugerman
My chaturanga has changed immensely over the years. I now realize that “powering through” was only harming me and that “performing” to achieve that picture-perfect pose wasn’t in my best interest.
I realigned—and even redefined—my chaturanga dandasana with the following six tips. I hope they benefit you as well.
1. Stabilize the shoulder joints
The shoulder is actually made up of four separate joints (the glenohumeral joint, the acromioclavicular joint, the sternoclavicular joint, and the scapulothoracic joint) that—more or less—function together. Typically, though, we refer to the glenohumeral joint (where the head of the humerus meets the scapula in the glenoid fossa or cavity) as the “shoulder joint.” As the most mobile joint in the body, it can be quite tricky to stabilize when bearing weight in poses like chaturanga.

Because the humeral head fits into the very shallow socket of the glenoid fossa (or rather, doesn’t, as the fossa is much smaller than the humeral head), this ball-and-socket joint can easily move out of its “perfect fit” alignment. In fact, “the humeral head is nearly four times larger than the glenoid cavity”(1) and because of the difference in sizes and the fact that “the glenoid is shallow, pear-shaped, [and] relatively flat…only a portion of the humeral head can be articulated with the glenoid fossa in any given position.”(2) Due to this precarious articulation of the bones, it is important to stabilize the musculature surrounding and supporting the joint.
To maintain integration of the joint, the shoulder can be stabilized by following four steps. I find it best to practice this stabilization first without weight-bearing (with the arms just extended forward in line with the shoulders while in a seated position). Then practice with weight-bearing in tabletop or plank pose (as shown below). Maintain the actions that you create in each step as you add on more with the subsequent steps.
To stabilize the shoulder joint:
• Press the floor away from you so that your shoulder blades draw apart and your upper back rounds slightly—this will activate your serratus anterior muscles (stabilizers of the scapulae, or shoulder blades), which wrap like fingers around the rib cage.
• Counter this by plugging your humerus bones (upper arm bones) back into your shoulder sockets. In plank, you can do this by consciously lowering your torso ever so slightly down toward the floor—this will activate your subscapularis muscles (which are humeral stabilizers) as well as subtly engage the other muscles of the rotator cuff (more stabilizers of the humerus bones), which attach across the scapulae.
• Isometrically hug your arms into the midline—this will re-engage your serratus anterior muscles.
• Counter this by broadening your chest (as if your collarbones were smiling)—this will subtly engage your rhomboids (which are also scapular stabilizers, and the antagonists of your serratus anterior muscles), located between your shoulder blades.
In order to maintain stability within these smaller muscles of the shoulder, all of these actions should be subtle and refined (so that your larger, “bulkier” muscle groups don’t override these smaller ones). Consciously maintain this stabilization as you move through the following steps into chaturanga.
2. Shift your weight forward in space
Ideally, when moving into full chaturanga from plank, the momentum of your movement is forward (rather than directly down—think resisting gravity!). Without shifting your weight forward to prepare for chaturanga, your momentum will be downward, and your elbows will end up far behind your wrists, throwing off the entire distribution of your weight and potentially irritating your wrists, elbows, and shoulders and/or even setting them up for injury. Aim to shift forward enough so that your elbows align roughly over your wrists when you lower down.
To begin, find an engaged plank position. Align your shoulders over your wrists. Extend energy out through your heels as if you’re pressing them into a wall behind you. Reach the crown of your head and your tailbone in opposite directions and fire up your core by lightly “cinching” your waistline (like you’re cinching a drawstring), drawing your “hip points” (ASIS) toward each other, and gently hugging your navel toward your spine and up toward your rib cage. Stabilize your shoulder joints as explained above: Press the floor away, draw your upper arm bones into their sockets, energetically hug your arms toward each other, and broaden your chest.
From here, inhale and shift your weight forward so that your shoulders move past your wrist creases. (Depending on your flexibility or anatomy, you may need to bend your elbows slightly before leaning your weight forward.)
3. Point your elbows straight back
By “winging” out your arms or squeezing your elbows too close to your ribs in chaturanga, you run the risk of destabilizing the shoulder joints, overburdening specific muscles while underworking others, or even disengaging your core by resting the weight of your torso on your elbows.
In an optimally aligned chaturanga, your elbows will point straight back behind you—not hugging in too closely and not winging out too widely.
Because the elbows are simple hinge joints, they allow for only flexion and extension—not rotation. So if the elbows wing out or hug in too closely in chaturanga, the rotation that is necessary for those movements is occurring in the shoulders (which allow for rotation) rather than in the elbows. By rotating the shoulder joints during chaturanga, you run the risk of destabilizing the whole region—which is definitely not ideal. To avoid this, only hinge at the elbows.
Once you’ve shifted forward, bend your elbows and point them straight back so that the elbow joints do nothing except hinge. Don’t glue your elbows to your ribs; don’t let them float away from your body either. Engage hasta bandha (hand lock)—by spreading your fingers wide with even spacing between them, pressing down equally into all four corners of your palms, and gripping at the mat with your fingertips—to maintain stability in your wrists and the integration of your shoulders that you’ve already established. Allow your torso to float freely between your elbows so that you’re not collapsing in your core by resting the weight of your torso on your arms.
4. A 90-degree angle is not necessary
This was probably the biggest shock for me. I’ve always had somewhat of a Type A personality, so I wanted every chaturanga to look Instagram-worthy with a beautiful and “perfect” 90-degree angle.
The truth is, it is hard to maintain shoulder joint stability while weight-bearing with the elbows at 90 degrees. For most people, the arms should be somewhere above that 90-degree angle so as not to collapse into the front of the shoulders (see next point).
You can stop at any angle that feels appropriate for you—and lower doesn’t necessarily mean “better” or even more challenging. The appropriate degree will vary from body to body. You should stop at a point where you feel that you could still press back up to plank without losing your engaged form. And you should feel a slight “buoyancy”—almost as if you could gently bounce up and down and still feel stable, strong, and secure.
5. Keep the fronts of your shoulders pointing forward or up
To maintain shoulder joint stability in chaturanga (with the head of the humerus integrated into the very shallow glenoid cavity), the front of the shoulders should point either forward or up—not down. If the shoulders point down, then the head of the humerus also points down. If that happens repetitively, you run the risk of irritating the labrum (the protective capsule of the shoulder socket composed of cartilage), bursae (protective fluid-filled sacs within the joint), tendons (tissues that connect muscle to bone), and ligaments (tissues that connect bone to bone) of the shoulder and/or more by “jamming” the humerus bone beyond its perfect fit within the glenoid cavity.
Decreasing the angle of bend in your elbows as mentioned above can help to make pointing the shoulders forward or up more accessible. Subtly rolling the fronts of your shoulders back and drawing your shoulder blades slightly down your back also helps to maintain this action.
6. In chaturanga, broaden your collarbones again
Along the same lines, to maintain shoulder stability, you need to broaden through the chest. This will keep the scapulae stabilized on the rib cage without majorly contracting the pectoral muscles, which could result in collapsing the chest so the front of the shoulders hunch forward and the scapulae “wing” off the back, a posture which could potentially destabilize the whole shoulder joint in the pose.
Maintain openness through the chest by subtly broadening your pectorals as if you were spreading your collarbones away from each other—even (and especially!) while in full chaturanga.
Chaturanga is a difficult asana. And it can take years and years to embody the subtleties of alignment in this posture. I’m still working on it for sure! But when practiced efficiently and effectively, these six subtle activations and cues may dramatically change your chaturanga—as they did mine.
As with all aspects of yoga, cultivate mindfulness and awareness as you move through it and always remember that it’s not about “perfecting” the poses—it’s about the journey that is your practice.
Footnotes:
1. Sager, M., Herten, M., Ruchay, S., Assheuer, J., Kramer, M., & Jäger, M. (2009). The Anatomy of the Glenoid Labrum: A Comparison between Human and Dog. Comparative Medicine, 465-475. doi:10.3897/bdj.4.e7720.figure2f
2. Elrod, B. F., M.D. (n.d.). SHOULDER INSTABILITY.

